
I first shared this formula in 2012, and as it’s been copied by everyone without credit and scraped by AI, I figured I might as well share it for free. It’s a tried and true formula that works with any liquid oils, butters, solid oils, esters, silicones, or hydrocarbons, like squalane. You can substitute the cetyl alcohol for stearic acid and make something thicker, but more draggy. The key is to follow the instructions as written so you can create something incredibly awesome! I’ve updated this for 2026!
It’s Tuesday! Did your supplies arrive? Are you ready to make a lotion? Do you have your supplies ready? All right! Let’s go!
Before we start…
 If you like lotion making, I have dozens of e-books in the shop about lotion making!
I suggest this one if you’re a first time lotion maker – The only lotion formula you’ll ever need! – as I teach you how to make lotions from scratch, then modifying them, using one emulsifier so you don’t need to buy loads of supplies.
And I recommend the Beginners! Start here! Section of the site so you can learn how to make formulas from the very beginning.
For more lotion making, check out the Newbie Tuesday beginners’ lotion making series where we make emulsions with Ritamulse SCG, e-wax NF, Polawax, BTMS-50, Phytomulse, Olivem 1000, and Simulsol/Lotionpro™ 165.
Where to find supplies?
I have lists of suppliers you can find in the resources section of the blog – just click “resources” in the menu to see it, then scroll down to where it says “shopping for supplies”. If you have suggestions for suppliers you’d like to share, please comment in the appropriate post as it’s nice to hear about personal experiences when shopping!
Where to get supplies in Asia?
Where to get supplies in Australia and New Zealand? – UPDATED AND NEW!
Where to get supplies in Canada? (updated, 2018) – free post
Where to get supplies in Europe?
Where to get supplies in the USA?
As a note, we have coupons for Innovation level subscribers from Lotioncrafter (USA), Windy Point Soap Making Supplies (Canada), and Voyageur Soap & Candle (Canada) in 2026. Click here to see those coupons!
BASIC FIRST LOTION FORMULA WITH HUMECTANTS
HEATED WATER PHASE
67% distilled or reverse osmosis water
3% glycerin, propanediol 1,3, or sodium lactate (powder or liquid)
HEATED OIL PHASE
15% liquid oil of choice
5% butter of choice – most common are cocoa, mango, or shea butter, but any will do just fine
3% cetyl alcohol
6% Polawax or BTMS-50
COOL DOWN PHASE
0.5% fragrance or essential oil (optional)
0.5% Germall plus, liquid or 1% Jeecide CAP-5, 1% Optiphen Plus, or 1% Germaben II (preservative)
Please note that changing the preservative or changing the emulsifier changes a lot of things, including changing the entire process by which you make the lotion.
Please make this lotion the way it is written with the instructions I have shared below.
 Preparing your brain!
You can do this! It’s not rocket science – it’s cosmetic science, which much more awesome and useful in your daily life! You will not pre-suck! (We define this in craft group as saying you suck before you’ve even started so when you fail, you can say “I told you so”, and not lose face. Or saying “I’m not good at this new thing”, and you won’t be, because it’s something new and we’re not going to be perfect the first time out!)
Just think…in about an hour, you can say you’ve made a lotion and have something to show for your hard work and research.
Take a picture of it and send it to me at swiftcraftymonkey@swiftcraftymonkey.blog so I can see what you’ve made! I’m quite excited by all of this!
What do you need to make this formula?
💧 Double boiler – I use an electric fondue pot, but you can make one with a pan with water in it
💧 Digital scale that measures at least 1 gram.
💧 Thermometer to measure the heated oil and heated water temperatures.
💧 Two containers – one for the heated oil phase, one for the heated water phase. I like to use heavier glass containers because they don’t bob around in the water of the double boiler, but plastic and metal are fine too.
💧 Spoons to mix the ingredients while they’re in the containers in the double boiler.
💧 A hand mixer or immersion blender. We can mix with either for this formula. You can’t use a hand-powered utensil, like a whisk or spatula.
💧 Funnel or piping bag to get the lotion into the bottle.
💧 Spatula, to get the last of the lotion out of the container, not for mixing.
💧 One 120 ml (4 oz) bottle with a pump on it or one tottle bottle of 120 ml/4 oz for every 100 grams you make.
💧 Label that you can put on the bottle so you know what you’ve made.
Preparing your space & equipment!
 Ensure that your space is clean and tidy. Make sure all your containers, utensils, and everything else have been cleaned well. (Click here for related link.)
Get a bottle (or two) ready for your lotion. (You don’t need to clean your bottle. If you bought it from your supplier, then it’s assumed to be clean!)
If you’re making the formula I mentioned in the first Newbie Tuesday post, then you’ll make about 3 ounces or 90 ml of lotion, which will require a 2 ounce bottle with a little left over or a 4 ounce bottle with some head space at the top.
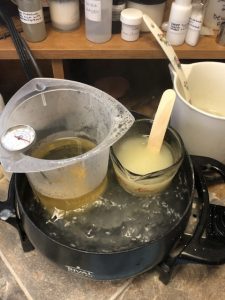
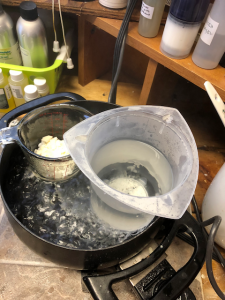
Preparing the double boiler!
First, turn on your double boiler apparatus (or turn on the burner on the stove) and get the water in the double boiler warming. You want this to be boiling because we need the water to be hot enough to melt the ingredients, which means we need it to be well above 80˚C (176˚F).
 I’m not sure of the exact amount of water you should add to your specific double boiler: Add enough that the tops of containers aren’t covered by the water and it won’t spill into the containers if the water accidentally starts boiling.
I generally find that getting the water half way to 3/4 of the way up the side of my Pyrex jug should take me through to the end of the heating and holding phase. You can boil up the water in a kettle or pot before using it in the double boiler, if you like.
Next, get your supplies and equipment ready. You’ll be using a scale for all the measuring, so make sure it has a prominent place on the counter top.
If you haven’t cleaned your containers recently, you can spray them with alcohol, let them sit for a few minutes, then wipe them out with a clean cloth or paper towel.
You need two heat proof containers (Pyrex jugs, for instance) – one for the heated water phase, one for the heated oil phase. And you’ll need a spoon for each container because you won’t be able to resist having a stir as they heat!
Instructions for making a basic hand & body lotion that works for a number of different emulsifiers!
Before you start, set your burner to high or set your electric fondue pot thing to the highest temperature and get the water boiling. Maintain that boil through the process.
 1. Weigh your water phase into a heat proof container and put into a double boiler. You can start with warmed distilled or reverse osmosis water to 50˚C (122˚F) to get things started.
1a. Weigh your total water phase on a scale – container and all – so we can compensate for the lost water before mixing. Write down this number.
And set some water in a separate container to heat. A pot with water on the stove or boiling up the kettle works well. You don’t need to boil it the whole time – bring it to boiling now and you’ll have some less-than-boiling water for step 3a. You can start with warmed water to 50˚C (122˚F) to get things started.
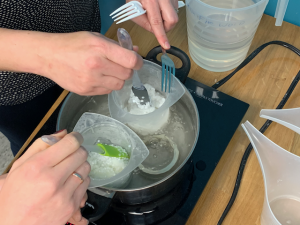
Don’t weigh your phases with any utensils in them. Take out the spoon, fork, spatula, and other things and just weigh the container and the ingredients.
2. Weigh your oil phase into a heat proof container and put into a double boiler.
 3. Heat both phases to 73˚C (163.4˚F) and hold for 20 minutes. This ensures both phases are the same temperature when we mix them together.
This is part of the emulsification process – the heating part of emulsification.
You can go over the suggested temperature by a few degrees, but try not to go up to 80˚C (176˚F).
Place the containers into the double boiler. Make sure the water is covering as much of the container as possible, but don’t have it so high that if it bubbles, sit gets into the ingredients.
You want to have the water as high as you can without having it boil and bubble into your ingredients.
Below the water line, you’re getting all kinds of indirect heat from the water and from the bottom of the pan/fondue pot.
Above it, it can be cool to the touch and barely over room temperature. This is why we want as much water touching the container as possible.
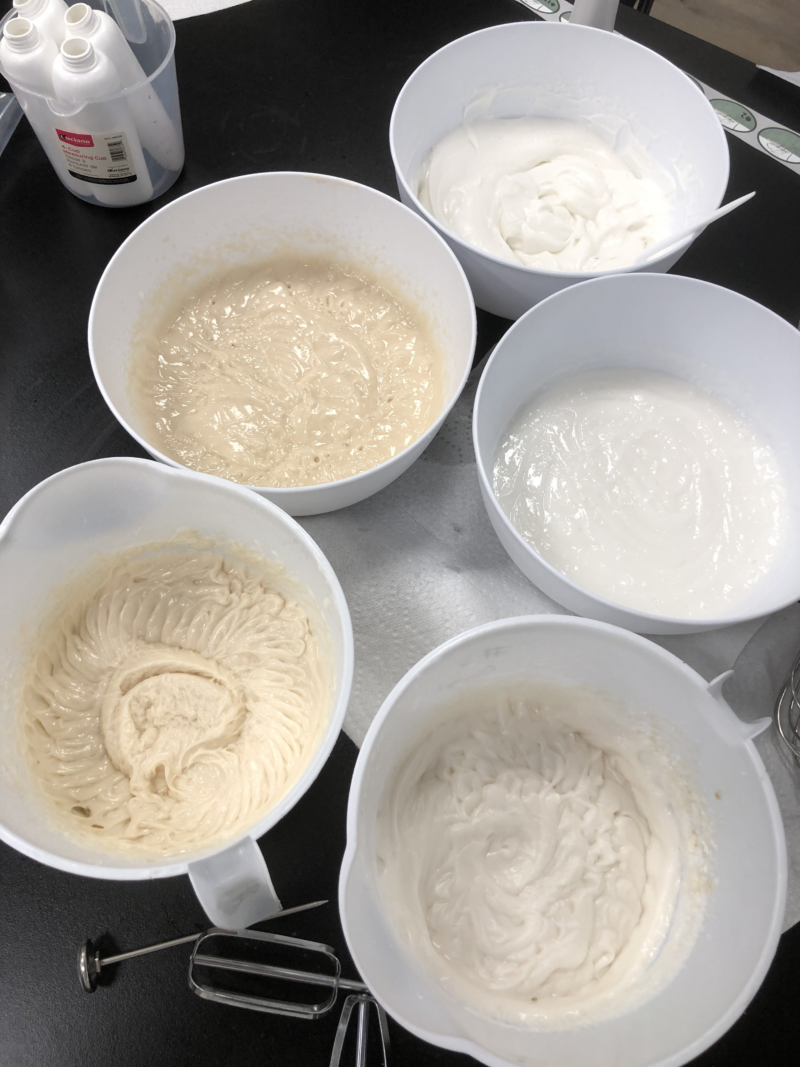
 As it starts to melt, stir regularly to get the stuff at the bottom to the top and the stuff at the top to the bottom. Scrape the sides if necessary.
You can add more boiling water to the double boiler if you’re finding the sides of the container are collecting solids. This means your ingredients are cooling and solidifying, and that’s kinda the opposite of everything we’re trying to do here.
3a. Remember how we measured the water phase in step 1a? Measure it again – zero your scale, then measure the container with ingredients. Add enough of the warm water to get you to the total weight from step 1a.
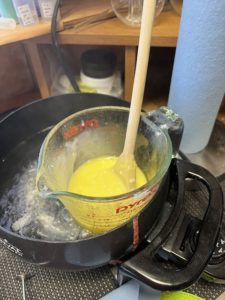
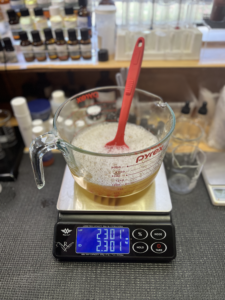
4. When both phases reach 73˚C (163.4˚F), pour the oil into the water phase and mix well with a stick or immersion blender (high shear) or a hand mixer with a beater blade (no shear). I usually mix for 3 to 5 minutes, depending on how much my arm hurts that day. Mix periodically as the temperature drops.
![]() As a note, don’t use a whisk attachment or a milk frother as this will add too much air.
As a note, don’t use a whisk attachment or a milk frother as this will add too much air.
Don’t mix it by hand – we need the speed and energy of a mechanical instrument! There’s no advantage to making anything by hand with lotions, and you are risking that it’ll separate in the near future.
 Related posts:
Tips & techniques: Never mix emulsions with whisks, spatulas, spoons, or other utensils!
Why do I suggest starting with a stick blender, then moving to a hand mixer with some emulsifiers?
5. When you reach 45˚C (113˚F), add your cool down ingredients directly into the lotion, and mix very well with a low/no shear mechanical mixer, like a hand mixer with one beater, Kitchenmaid stand mixer with a paddle, or overhead mixer with a propeller.
Add the cool down ingredients directly into the lotion, don’t measure it into a small container before adding it as you may end up losing a lot of the important things, like preservatives. To measure these smaller amounts, hit “zero” or “tare” on the scale, then put the lotion container on the scale. Make a note of that amount, then just add the ingredient and count up from there. If it measures 566 grams and you want to add 2 grams preservative, then count up to 568 grams, for instance.
 6. Allow the lotion to come to room temperature (20˚C/68˚F) before bottling.
Cetyl alcohol and other fatty alcohols can take up to 48 hours to create their final structure, so it’s best to wait that period of time before packaging your product as you might not know the viscosity until then.
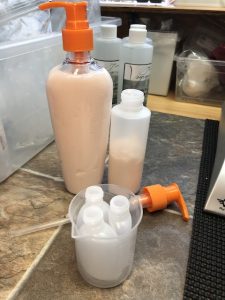
7. Packaging your products.
If you are using jars, just glop in what you have made.
If it’s a lighter lotion, you could probably pour it into the bottle with a funnel.
For thicker lotions, I have found using a piping bag (disposable, from the cake or chocolate decorating store) is the easiest way to get things into bags.
Click here for a post on condensation and why that’s a bad thing for our products!
Here are some bottling tips! And some tips on how to choose the best bottle for your product.
Check out the new packaging section of the blog!
8. Always label your bottle with the ingredients and date so you can replicate it or throw it away when the shelf life expires.
Here’s a post with another argument for heating and holding – critical micelle concentration, phase inversion, and solubility all lead to increased emulsion stability.
And here’s a post on why we heat and hold our phases separately.
And here’s a post on epic lotion failures and why that happens!
Good manufacturing processes
Here are a few things to keep in mind. We can never be truly sterile in the home environment, but we’re going to try our best!
 Heat and hold your ingredients in the water and oil phases for 20 minutes at 73˚C (163.4˚F). This ensures the two phases are at the right temperature for emulsification.
This doesn’t kill microbes in the water phase – this is for getting the temperature right for the emulsion.
Use distilled or reverse osmosis water. Although tap water is fine for drinking, it might contain metals and other things that might lead to contamination of your products. It’s not expensive – $2.00 for 4 litres or so – and it’s easy to store in your workshop. Plus, it’s pH 7 or neutral, something our tap water won’t be.
Related post: Q&A Quickies: Let’s talk about water – distilled, spring, mineral, alkaline, and reverse osmosis
Don’t worry about sterilizing your bottles. If they were stored properly and are from a reputable supplier, they are already clean. And don’t re-use bottles or jars. I know this seems wasteful, but you can never get them truly clean. And the rancid smell of oil ruins the next product in the jar!
This is a super important post! Packaging: Why you don’t clean your containers before using them…
Choose your containers well. Some bottles can’t handle high amounts of fragrance oil, for instance, or others will suck the fragrance out! Most of the bottles you get at our suppliers are just fine.
Use only body safe fragrance oils and ingredients. A candle oil might smell nice, but if it’s not approved for body use, don’t even think about it!
If you are planning to sell your products, get them challenge tested at a lab. Yes, this costs money, but it’s better than sending out contaminated products. And don’t make claims about your products. And watch your language! I know use the word “soothe” for some ingredients, but you can’t make that claim on a body wash or lotion you might sell.
Some tips on lotion making!
 Write everything down. Every single thing you do every time you do it. Every time I make something, I write out the formula again and make notes about what I changed, hand slips where I added more, things I may have changed, and everything else so if I like it, I can make it again. If I don’t like it, I know what to avoid.
Keep a separate folder on the computer for your formulas. I have a few of them, including one for formulas I’ve made, one for formulas I’d like to try. I keep all my printed notes in a binder in plastic covers. I write on them with grease pencil as I’m working in the workshop, then update the formulas afterwards. The ones I really like go into my lab notebook.
Cleaning up is easier if you’re using a d-Limonene based cleanser (something with “orange oil”). It really does break down grease. Make some for yourself using a dishwashing liquid and 10% d-Limonene and 10% polysorbate 20. I squirt this into my washing tub in the sink, then I throw the dishes in as I’m using them. I wash them, then they are suitable for the dishwasher without the greasiness!
Buy spoons! I went to a restaurant supply store and bought a ton of spoons! You’ll need them. And visit the dollar store for funnels and bags and other things!
 Get a good scale. I realize this should have been the first note, but I didn’t think of it until now. A good digital kitchen scale – I use Escali – that can weigh to 1 gram is great, and one that measures to 0.1 grams is a good idea if you’re making facial products or using ingredients that are used in small quantities. Get one of each scale – finding one that goes up to 3 kg and measures 0.1 grams will cost you a fortune!
Learn more about equipment in the equipment section of the blog, always located under “resources” in the menu bar.
Pyrex jugs are your friend! I have a few in each size – 1 cup, 2 cup, 4 cup, and 2 litres – and you will always want more! Beakers are great, but you don’t necessarily need them.
Keep good notes!
Have your notebook beside you with the formula printed in quite large font and a pen or pencil at the ready.
Writing notes is vital to make sure you know what you did this time and what to do (or not to do) next time!
What oil did you use?
Which butter?
Did you go a little over the suggested amount for anything?
How long did it take for the phases to get to 73˚C (163.4˚F)?
How much water did you lose?
And now you’re done! Rejoice! Do a happy dance to celebrate the making of the lotion! You’ve done it!
Congratulations! You did it! Now use it all up very quickly so you have a cheap excuse to make another one!
 So, what do you think? Share your thoughts, suggestions, formula modifications, questions, and more in the comments or write to me at swiftcraftymonkey@swiftcraftymonkey.blog and share your lotion making experiences!